Showing posts with label Windows 8. Show all posts

Thursday, 13 March 2014

Setup OneDrive to automatically sync everything in the Documents folder

If you've got Windows, and you tend to use more than one computer or device like a tablet, then keeping your documents in sync is a great way to make sure you're always working on the latest file.

The new version of Microsoft Office 2013 has this functionality already built in, enabling users to create and save documents straight to and from OneDrive (formerly known as SkyDrive). But what about all those other documents you'd also like to access? Examples including files you've received from an email or documents you've downloaded from a website.

Usually many users will save these files to their documents folder. So now, you've got your Office files saved in your OneDrive and everything else is in a folder on one computer not accessible by other computers. Well that's about to change.

If you set your "Documents" folder location on your PC to be your OneDrive location, everything saved in this folder will be synchronised with the cloud. Here's how to do it.

Assuming you have OneDrive installed on your PC already (or SkyDrive if it hasn't updated yet!), right click on the documents folder in the file explorer, and choose properties (as shown below, click to enlarge picture).
In the properties window, choose the location tab, then choose move. In the box that appears, double click OneDrive (or SkyDrive depending), and then select the documents folder inside (one click), and then choose "select folder" when it's highlighted.
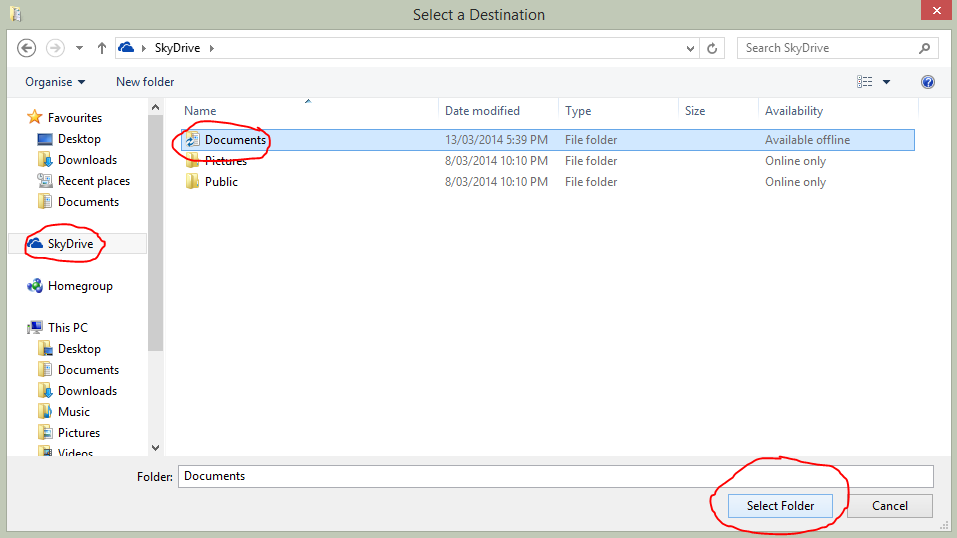
Once done, hit ok. Now all the files in the "Documents" folder will be saved on OneDrive, so you never have to worry about losing your documents.
Now if you sign into OneDrive on your smartphone, tablet or another computer, all of your documents will be readily available.

Pro Tip: Microsoft gives you 7GB of free storage with OneDrive, which should be plenty for documents and related files, as text type files such as spreadsheets, presentations and text documents are relatively small in terms of file size. So it is important to make sure you only store documents in there and you should have enough space. Example, make sure music files (such as pesky iTunes library files) aren't saved in your "Documents" as this can take up lots of space quickly.

If you liked this post, or found it useful, please feel free to share with your friends to pass the info on using the buttons below. As always, any comments or questions can be left in the comments box below.

Wednesday, 25 September 2013

"Documents.library-ms" is no longer working, error in Windows 8

"Documents.library-ms" is no longer working. This library can be safely deleted from your computer. Folders that have been included will not be affected.
I've you've got this error, it just means that the link to the folders that Windows is currently using broke, and just needs to be repaired.

Most users won't create new libraries and will just use the default ones included in the system. If this is you, all you need to do is delete them and re-add them.

To do this, open any explorer window, and go to the Libraries option just underneath your favourite links.
Open the Libraries folder and delete the files. Then in the left hand column right click the Libraries and choose restore defaults.

Fixed!

If you liked this post, or found it useful, please feel free to share with your friends to pass the info on using the buttons below.

Tuesday, 9 April 2013

Windows XP support ending

One year from today, Windows XP will be officially unsupported by Microsoft.

As noted on their life-cycle support page, there will be no more updates coming out of Redmond for the unbelievable success that is Windows XP. This operating system has been going since 2001, which makes it 12 years at time of writing. For software to last that long in the industry where things are changing every minute, and people have a hard time keeping up with the trends this is a huge deal, and massive success.

However, as mentioned, this success is coming to an end. Microsoft will be officially discontinuing the product. What does this mean for you?

  • Security vulnerabilities. If hackers find an exploit in Windows XP that is currently unpatched, they might choose to wait till after the product is discontinued before attempting their attacks on a system, or systems. This is a very real threat, that could cause loss of data, identity theft, etc. Having an up-to-date system is very important to receive regular updates on these vulnerabilities, and ensure your computer is patched and updated.
  • Hardware support. With new hardware coming out and the discontinuation of XP, getting digitally signed drivers for your hardware will become a very difficult task. You may not get the best performance out of your hardware, or worse, it might not even work, as there may not be a driver for it available.
  • Software support. Newer programs such as Microsoft Office, Internet browsers, etc may stop receiving support for XP, and as such, you'd experience a slower performance, web-pages may not display properly, or not at all, and some programs may cease to operate altogether.
So, with the above in mind, you'll probably need to get a new system. Unless your computer is as old as XP is, there is a good chance that it will work fine with some of the newer versions of Windows that are available.

Purchasing a copy of Windows 7 is impossible through Microsoft I've been informed both by trying myself online on the Microsoft store, and on the phone, but it is available if you go to computer shops and retailers that may still have copies left available for sale.

If you missed out on the Windows 8 upgrade offer from Microsoft when Windows 8 was first announced for $39, Windows 8 is available for sale on the Microsoft Store for AU $149.99, which will get you the Windows 8 operating system. However, some places are selling copies of Windows 8 for $59 on the store shelves, I have seen it available at JB-HiFi (if you live in Australia). Even if you don't need it now, you should probably get it before stocks run out at that price, and you'll have to pay nearly 3 times that later.

Alternatively, if you have XP on an old machine, and you don't think it will last more than a year, you may be better off just holding out, and buying a new computer next year which will come with Windows pre-loaded on it.

Any questions? Fire away in the comments section below!


If you liked this post, or found it useful, please feel free to share with your friends to pass the info on using the buttons below.

Tuesday, 12 February 2013

Easy steps to keep your Windows 8 PC backed up

With the recent release of Windows 8 from Microsoft, keeping your PC protected and backed up is simple and effective in the rare event of a system failure. Let's get it setup!

To start, lets move the mouse to the right hand side of the screen, and choose the search option from the charms that appear on the right. (see pic). In the box that appears type "recovery". Choose the settings option underneath the search box, and one of the options in the list should be labeled windows 7 file recovery. Don't worry about the fact it says windows 7, this is just carried over from the previous versions of windows, so if you already have a backup, you can continue to use it.

The next screen that appears should look something like this:

As you can see, this computer that I'm using is already backing up to a network location, however if you haven't already got yours setup, there should be a setup backup option you can click on to start the wizard which will guide you through the process.

The first screen will ask you where you want to save your backup. I'd recommend saving it to a external hard drive, or a network drive, as there is no point saving it to the same hard drive your computer is currently using, as that would render the whole back up process pointless if your hard drive fails :)

As you can see, I have a few hard drives and a network location saved on this computer to use. I'm going with the network drive option. If you want to save on a network also, you can click save on a network button which will take you to a separate screen to get setup.

Once you've chosen what your location, you then need to choose what you want to back up. You can let windows decide, or you can choose what you want to back up. I like this option, as I feel it gives me more control over what will be backed up, opposed to what might be backed up. The next screen, asks what specifically I want backed up.


In this instance I am backing up my libraries, and everything on my system drive. If you only have one hard drive, I'd recommend choosing to enable the system image option.

Clicking next will review the settings you've selected and you can save and exit the wizard. The computer will then start backing up your files.

Things to note:
  1. If you've selected an external backup drive, make sure it's plugged in when you want to back up
  2. If it's not, Windows will wait till the next time it is to make the backup
  3. I'd suggest to come back to the back up page every now and then to make sure it still is backing things up for you and that the settings are still up to date.


If you liked this post, or found it useful, please feel free to share with your friends to pass the info on using the buttons below.

Wednesday, 12 December 2012

Windows 8: How to get the snipping tool back

If you've got Windows 8 and you used the snipping tool a lot in Windows 7 butyou can't find it in 8, you've come to the right place.

To get the snipping tool, go to Start by hitting the Windows key on your keyboard, or button if you're using a tablet. Then just start typing the word "snipping tool"

It's likely that before you even finish typing the two words the icon will appear. Click it, and away you go!

You can pin the snipping tool to the Start menu if you use it frequently by right-clicking the icon before you launch the program, and choosing "Pin to Start" down the bottom.
You can also do this with any application you use frequently. Just start typing the name if you don't see it, and pin it to the start menu. You can then rearrange your start menu as you like by dragging the tiles around to where you like them.

If you liked this post, or found it useful, please feel free to share with your friends to pass the info on using the buttons below.

Monday, 10 December 2012

Windows 8: How to access "My Computer"

I've recently upgraded my computer to Windows 8, and I am the sort of person who keeps all of their files in organised folders - sort of. Since the introduction of the new operating system from the team at Redmond, aka Microsoft, I've found that accessing these files is not easy to do like it used to be. Either I'm not taking the right steps, or the options just aren't immediately accessible.

I have found a solution that works in the interim. On the right, is a picture of the task bar, with the familiar icons (the first two anyway) that come as standard with a Windows 7 installation. As I upgraded from Windows 7, I am unsure if they are standard with Windows 8, but this guide is going on the assumption that you either upgraded from 7 or they are standard in 8.

Clicking the folder icon will bring up the "Libraries" window which shows your documents, pictures, videos etc. On the right is a navigation pane, which you can use to view different folders on your computer. You'll notice that there is the "Favourites" section up the top, then the Libraries section, then Homegroup and finally Computer. The "Computer" section is the one we are interested in for this guide.

Right clicking it will give you a number of options, look for the one that shows "Pin to Start".

This will create a tile in your start menu, which you can access from literally any program simply by hitting the Windows key on your keyboard.

You can move this tile around by clicking and dragging it to the desired location in your start menu screen, giving you instant access to your hard drive, devices and network locations attached to your computer.

If you have any questions or comments, feel free to post in the comments section below.

If you liked this post, or found it useful, please share with your friends to pass the info on using the buttons below.