Wednesday, 16 March 2016

How to stop Whatsapp automatically saving photos to your phone

Camera roll on your phone filling up with too many photos you don't care about? Worse - they're being backed up too? A quick fix to solve!

If you're an iPhone user, go to settings down at the bottom right, then select the chats menu option.
In there, change the slider to off for "Save incoming media". Now future photos won't be saved to your camera roll, or in your iCloud photo library which should help with the pesky message about your iCloud storage being full.

If you're an Android user, Download a file explorer app, such as ES File Explorer and then navigate to sdcard/WhatsApp/Media. Then, rename the “WhatsApp Images” and “WhatsApp Video” folders to “.WhatsApp Images” and “.WhatsApp Video” respectively.

If you liked this post, or found it useful, please feel free to share with your friends to pass the info on using the buttons below.

Sunday, 7 September 2014

Best practices for batteries in phones and computers

Got a smartphone or a tablet or a laptop? Are you reading this article on one? I'm willing to bet you haven't read the manual that came with it or have no idea how to get the best battery life out of your device. Well, lucky for you, you're in the right place because I've done the hard work for you. Well, I actually did it for myself, but thought it might be nice to share.

There are quite a few different types of batteries around that can be found in everyday consumer goods. To name a few in the range, Ni-MH (Nickel-Metal Hydride), Ni-CD (Nickel Cadmium), and Lithium Ion (Li-Ion). The most common found these days in laptops and phones (and tablets) is the Lithium-Ion variety. When you plug a flat Li-Ion battery in to charge, it goes through various stages of charging before it is completely full.
Image: Battery University
The first stage is the fast charge state. This is the stage where the device will gain the most amount of power in the shortest time. The battery is drawing as much power as it can from the wall, whilst of course maintaining safety restrictions put in by the manufacturer. Which brings me to:

Rule Number 1: Always use the official charger that the device came with.

There's a reason that they actually give you a charging pack/wall plug etc with your device. Yes, you can charge your phone or tablet through USB and yes you can also buy third-party chargers which appear to do the same job. However for the best lifespan out of your battery for your phone, you should always use the official charger that came in the packaging. The reason I can't emphasise this enough is on the plug, it will have certain specifications for how much current is being supplied to the battery. If it's not the official charger, either more or less current will be supplied to the battery and over time, prolonged use of unofficial chargers will affect the battery's capacity. This is especially apparent in chargers which claim to "fast charge".

The second stage is the trickle-charge state. Lithium batteries charge around 80-90% of their capacity in the fast charge mode, and the remainder is charged at a much slower rate. This is for a few reasons. One, it ensures that the battery is not overcharged, which could cause it to explode or burst into flame. This actually happened to someone who used an unofficial charger for her iPhone and it exploded whilst she was on a call to someone with the unofficial charger plugged in. This second stage is the best time to unplug your device from the wall and go. As Li-ion batteries don't actually need to be fully charged in order to operate at maximum performance, a partial charge is better.

The third stage is where batteries are finished charging and don't draw any more power from the wall as they are fully charged. This brings me to:

Rule Number 2: When charging your phone, laptop or tablet, turn it off.

This might be an annoying concept to deal with, and using the device whilst charging might seem like a good idea, but it actually reduces your battery's maximum capacity. According to the Battery University:
A portable device should be turned off while charging. This allows the battery to reach the threshold voltage unhindered and reflects the correct saturation current responsible to terminate the charge. A parasitic load confuses the charger.

Put simply, if the battery is not in use whilst charging it can reach the maximum capacity without the use of the device draining it at the same time. The battery can "get confused" and think it's full, but since you're using it, it is also draining power so it continues to charge as it hasn't quite reached full capacity. This in turn can reduce the overall maximum capacity of the battery as it would be continually charging, even though it's at near 100%. My suggestion would be that if you absolutely must use the phone or computer whilst it's plugged in, either use it whilst the battery is in the fast charge state and then unplug it, or just take the battery out (if you can).

Some further guidelines for battery charging from Battery University:
  • Charge at a moderate temperature (i.e. room temperature). Do not charge below freezing.
  • Chargers use different methods for “ready” indication. The light signal may not always indicate a full charge.
  • Discontinue using charger and/or battery if the battery gets excessively warm.
  • Before prolonged storage, apply some charge to bring the pack to about half charge.
  • Over-discharged batteries can be “boosted” to life again. Discard the battery pack if the voltage does not rise to a normal level within a minute while on boost.

Hope you found this helpful, and if you're interested in further reading:
If you liked this post, or found it useful, please feel free to share with your friends to pass the info on using the buttons below.

Friday, 14 March 2014

Google Drive starts price war on online storage

According to their blog, today Google released cheaper pricing on their Drive product, Google's version of online cloud storage. What is Google Drive I hear you ask? Find out here.

Prices have dropped significantly, to the point where an extra 100gig of data, on top of your free 15gb will cost you less than $2 per month. This is very aggressively priced against the other online cloud storage providers such as Dropbox and OneDrive which I wrote about yesterday.

For so much storage at such a low price, it's a great option to have all your photos, music, videos, documents, files, stuff... whatever really saved in a secondary spot and available all the time in case anything happens and you lose your files. An 80% discount on a terabyte of data for less than $10 per month is a real bargain and an absolute must if you can't afford to lose any files.


If you liked this post, or found it useful, please feel free to share with your friends to pass the info on using the buttons below.

Thursday, 13 March 2014

Setup OneDrive to automatically sync everything in the Documents folder

If you've got Windows, and you tend to use more than one computer or device like a tablet, then keeping your documents in sync is a great way to make sure you're always working on the latest file.

The new version of Microsoft Office 2013 has this functionality already built in, enabling users to create and save documents straight to and from OneDrive (formerly known as SkyDrive). But what about all those other documents you'd also like to access? Examples including files you've received from an email or documents you've downloaded from a website.

Usually many users will save these files to their documents folder. So now, you've got your Office files saved in your OneDrive and everything else is in a folder on one computer not accessible by other computers. Well that's about to change.

If you set your "Documents" folder location on your PC to be your OneDrive location, everything saved in this folder will be synchronised with the cloud. Here's how to do it.

Assuming you have OneDrive installed on your PC already (or SkyDrive if it hasn't updated yet!), right click on the documents folder in the file explorer, and choose properties (as shown below, click to enlarge picture).
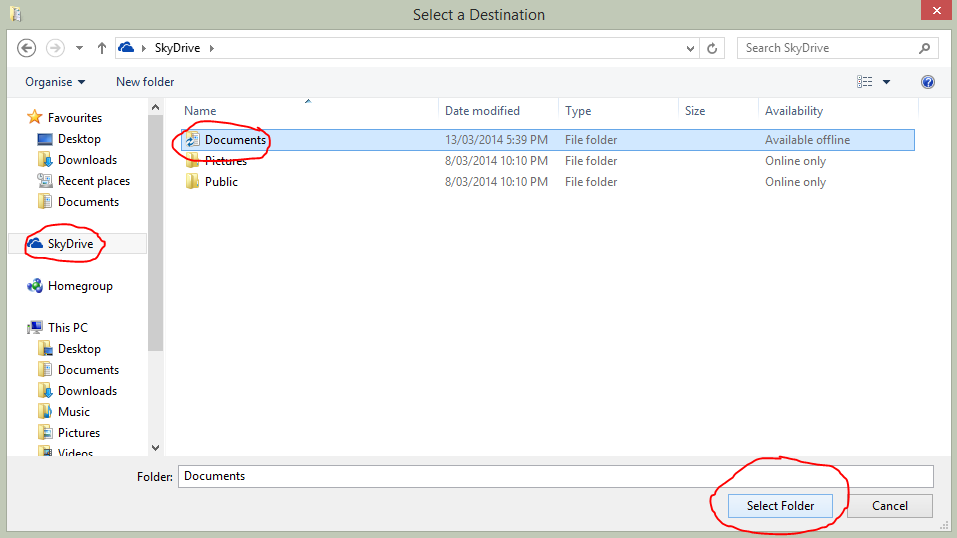
In the properties window, choose the location tab, then choose move. In the box that appears, double click OneDrive (or SkyDrive depending), and then select the documents folder inside (one click), and then choose "select folder" when it's highlighted.
Once done, hit ok. Now all the files in the "Documents" folder will be saved on OneDrive, so you never have to worry about losing your documents.
Now if you sign into OneDrive on your smartphone, tablet or another computer, all of your documents will be readily available.

Pro Tip: Microsoft gives you 7GB of free storage with OneDrive, which should be plenty for documents and related files, as text type files such as spreadsheets, presentations and text documents are relatively small in terms of file size. So it is important to make sure you only store documents in there and you should have enough space. Example, make sure music files (such as pesky iTunes library files) aren't saved in your "Documents" as this can take up lots of space quickly.

If you liked this post, or found it useful, please feel free to share with your friends to pass the info on using the buttons below. As always, any comments or questions can be left in the comments box below.

Tuesday, 11 February 2014

Restore a deleted Mac partition table

Last Friday, I was attempting to install Windows on my partners iMac without a DVD/CD drive, and I had set up the drive in bootcamp, and committed the system to reboot. The Windows setup started, however when selecting the installation directory, Windows did not like the formatting that Bootcamp had setup, so it offered to delete the partition and recreate it's own NTFS partition - which I opted to do.

Still, Windows setup didn't like something about the disk - spitting out and error and not being able to proceed. A bit of (in hindsight amateurish) Google'ing and I found a solution to "clean the disk" which I accidentally interpreted as cleaning the partition. This was my downfall. What made the situation worse is that the TimeMachine backup which I thought was complete was in fact not complete, and hadn't been backing up for some time.

Crisis!

Having had a little experience with data recovery in the past, I straight away jumped on the data recovery search train and started my search for software which I could use to rebuild the partition table. The problem I found was that many sites and software packages were offering solutions based on disks which were either external drives or secondary to the operating system, which were useless to me, as the entire boot drive's partition table had been deleted.

Many hours of searching and looking at possible solutions included a number of data recovery programs which promised to recover partition tables or extract files from the hard disk but none prevailed. All I could do is boot from a USB stick or use the inbuilt Internet Recovery feature which comes with all Macs. This was dangerous as I didn't want to write to the hard disk, and I wanted maximise my recovery chances by avoiding any writing at all.

The hardest part was finding software which could look at HFS+ data recovery, or rebuilding partitions. Many programs promised the world, but even the trial versions did not deliver. In the end I found a completely free solution which I am happy to share with you now, so you can enjoy my happiness at being able to recover all that data by rebuilding the partition table.

In order to follow my guide, this only applies to Macs which don't have an optical drive.

You'll need:
  • Another computer to download install and use some software to help with this recovery.
  • A USB stick/thumb drive of at least 1gb in size (I used a 4gb stick)
  • A copy of an Ubuntu iso file (I used ubuntu-13.10-desktop-amd64+mac.iso - note the amd64+mac component of this file)
  • Download a copy of the freeware software "unetbootin"
  • A (relatively) fast internet connection with an ethernet connect to your modem - wifi won't work.
  • A USB keyboard and mouse - any should do. The bluetooth wireless mouse and keyboard that comes with most macs won't work throughout the whole process.
The guide:
  1. Once you've downloaded Ubuntu and unetbootin, insert your USB stick and burn a copy of Ubuntu to the USB stick so that you can boot from the USB stick (you can browse to the .iso file you downloaded which I would recommend instead of downloading on the fly).
  2. Plug the USB stick, keyboard and mouse into the damaged Mac and hold the option key when powering up. If you're using a non-mac keyboard, hold ALT on the left.
  3. Choose the USB icon to boot from and the unetbootin menu should appear, follow the menu to boot into Ubuntu which is the live version of ubuntu which you can use to test the OS, rather than install it.
  4. Within a few minutes you should be in the ubuntu desktop environment. Once there, go into the settings (cog icon on the left menu bar)
  5. Open software settings and enable all software from all repositories.
  6. Open a terminal window (click the ubuntu menu, then type terminal) and type "sudo apt-get update". This will update your software repositories which is necessary for the next step.
  7. Install a software program called TestDisk by typing: "sudo apt-get install testdisk". This will download and install testdisk on your system which we will use to interpret the damaged hard drive.
  8. Once complete, type sudo testdisk to open the program.
  9. The next few parts will be a bunch of questions asked by the software before it can begin scanning.
    • Decide if you want a log created (I didn't care)
    • Select the disk which relates to your Mac's Drive
    • Then it asks about the partition type - select Mac
    • The next choice should be analyse
    • And then quick search.
    • It will start scanning with items in green lines indicating partitions the software has found.
  10. After it has finished you should get some results showing the missing partitions!!
  11. At this screen, do not touch the keyboard yet. Grab the mouse and select the results and copy them. Then either write them down (not recommended as you could make a mistake which could cause SERIOUS problems later) or email them to yourself.
  12. My results looked like this: 
  13. You can now reboot your Mac.
  14. Once it restarts take out the Ubuntu USB stick and hold down command (or the windows key if a non-mac keyboard) and R
  15. This will start Internet recovery. Once at the Internet recovery menu, you can open a terminal window using the utilities menu.
  16. With the terminal window type ls (to LiSt the files of the directory you're in)
  17. Type "cd .." to navigate up one level in the folder structure.
  18. Type ls again
  19. Continue to do this until you reach the root directory, which will show "dev" when you do a ls command. Then type cd /dev/
  20. This will move you to the dev directory. At this point ensure your terminal window is as big as possible, use full screen if you can. Type ls again
  21. This will list all the devices on the mac. This is also where it becomes a bit difficult, so it's important to focus on what you are doing otherwise you could damage your disk even more.
  22. Type pdisk - this opens the pdisk program within terminal which allows you to make changes to your computers hard disk.
  23. Type L (note the capital) and hit enter - this will list the disks attached to your computer and should indicate which disk is required - this will be the disk we are looking for. For me, it was rdisk0 or rdisk1 (I can't remember which).
  24. Quit the program, by typing q, and then reopen the program by typing "pdisk /dev/rdisk0" (CAREFUL: your rdisk number could be different based on your result in step 23)
  25. Type c (lowercase). It should tell you that no partition map exists - which is correct - it doesn't yet, but we are about to recreate it.
  26. Type i (also lowercase). It will tell you some stuff about block sizes and the size of your hard disk in blocks.
  27. Type c again. Before anything else - get your info from step 12 above.
  28. In my example the first block was 409640 and the length was the "size in sectors" part, which for me was 1756533456. So type your first block part, hit enter then type your length. Then hit enter again and name it anything just don't use spaces - I just typed the word: one 
  29. Repeat this process for as many partitions that you had - I had 2. So I then typed c again to tell the program I had another partition to create, then 1756943096 and 1269536 and named it: two
  30. Then once you've typed in all your partitions, instead of typing c again, type w
  31. It might prompt you to confirm you want to write the changes, say that you do (y)
  32. Then type q to quit the program. Now restart your mac, holding down the option key.
  33. Your hard drive should appear. And you can boot back into OSX.
  34. First thing you should do now is setup a Time Machine Backup
I hope this has saved you from a sticky situation like it did for me. If you want to share the incredible moment I had yelling like Boris did in James Bond's Goldeneye feel free to buy me a drink:


If you liked this post, or found it useful, please feel free to share with your friends to pass the info on using the buttons below. Alternatively, if you're stuck, feel free to post your comments - chances are you are not the only one who got stuck at some point!

Sunday, 8 December 2013

Apple's Airport Series: A Router Worth Having

In my opinion, having one of these routers in your home is pretty much, if not definitely a necessary requirement. They make things oh-so-easy, and in true Apple style, clean, easy to use and wildly efficient.
airport family
Part of my job is to provide advice or make recommendations to my clients on new hardware or software to purchase when faced with a problem  that needs resolving, and usually needs resolving fast and permanent. I don't believe in a bandaid fix in my work, as it usually results in repeat work, and generally an unhappy customer.
Today I had a customer who was in dire need of a new internal network for his office. His modem/router/gateway device, whilst performing efficiently for at least the modem component is very dated and aged, and was starting to have DHCP and routing issues, as well as the wireless signal kept dropping out and was weak rendering it basically unusable. However, having had some experience with the AirPort line of products, I recommended he invest $119 in a small, simple and non-obtrusive device into his network, which would solve a lot of the routing issues, as well as enable easy shared printing.
I gotta tell you, it was great. Not only is the range on this little tiny device excellent, but the built in bonjour services as well as the static allocations for the various devices works excellently. I set the router up to be the PPP dialler also, meaning it handles the internet connection, all the modem needs to do now is keep doing what it does best, handle the data link between it and the DSLAM in the telephone exchange. The best part about this entire setup is that I configured the whole thing (except for the static allocations) without having to plug in a cable.
The AirPort family come in three different flavours currently. The baby of the group (the one I set up today) is the express model, which has a gateway ethernet port (to connect your modem to) and one ethernet port. You can either plug one device into this, such as a network printer, or computer that doesn't have a wireless connection. It has one USB port for either attaching a printer or a storage device, and apart from having the inbuilt wireless, it also has a jack to connect speakers to. Whilst the speaker jack is probably not so effective in an office environment, and probably aimed at the home user, it is great to have. Any Apple device can play music wirelessly through AirPlay to the speakers attached to the AirPort.
The bigger brothers of the AirPort express are the "extreme" models. You can either get one with a hard drive built into it for storing data or making easy backups, or you can get one without the internal storage. The extreme models also have a new technology built into them referred to wireless beaming as well as supporting the 802.11ac wireless standard. If you're streaming HD content, or need the extra range on wireless, this would be a better option over the express version. There are two extra ethernet ports (bringing the total to four, including one gateway port), and the speed of these ports on the extreme models is bumped up to 1gigabit up from 100megabit in the express model).

If you liked this post, or found it useful, please feel free to share with your friends to pass the info on using the buttons below.

Wednesday, 25 September 2013

"Documents.library-ms" is no longer working, error in Windows 8

"Documents.library-ms" is no longer working. This library can be safely deleted from your computer. Folders that have been included will not be affected.
I've you've got this error, it just means that the link to the folders that Windows is currently using broke, and just needs to be repaired.

Most users won't create new libraries and will just use the default ones included in the system. If this is you, all you need to do is delete them and re-add them.

To do this, open any explorer window, and go to the Libraries option just underneath your favourite links.
Open the Libraries folder and delete the files. Then in the left hand column right click the Libraries and choose restore defaults.

Fixed!

If you liked this post, or found it useful, please feel free to share with your friends to pass the info on using the buttons below.

Sunday, 15 September 2013

iOS 7: Coming next week. Why should you update.

Apple's new mobile operating system, iOS is coming next week, and is set to bring about the biggest facelift and change to the operating system since it's introduction back in 2007. As with most updates to the iOS system, Apple has promised over 200 features and new additions to the system.

Many of the applications have been given a flatter perspective and the overall skeuomorphic designs from all of the inbuilt applications has been removed. A whole new pallet of colours have been introduced as well as the obvious facelift throughout the entire system.
From the lock screen there are a number of things that can be done, you can see your notifications, your view of "Today" which is a summary of things that might be relevant to you and your day (more on this in a moment).

There is a new control centre which is also accessible from this screen. The control centre provides you quick access to change some system settings, such as turning off or on:
  • Airplane mode
  • Bluetooth
  • WiFi
  • Do Not Disturb mode
  • Screen rotation lock
In addition, you can also reach other features such as screen brightness, music controls, the all new AirDrop feature, airplay, as well as the camera, calculator, torch (turn the LED flash on), and compass.

Control centre is available from any screen you are viewing as well as the lock screen. Given that control centre links to applications which are not personally identifiable, this option is available from the lock screen and is on by default. However, you can remove it from the lock screen if you don't wish to have it left there for any reason.


The Today section of notification centre gives you a heads up on what's on your day. It gives you a quick overview of the weather - eg, showers with a high of 18, or sunny with a high of 30. Depending on the time of day it might give you the overnight low. In addition it will let you know if it's anyone's birthday, how long it will take for you to get to common destinations that you travel to such as work, gym, friends house, pub... Below this information will show you your calendar for the next few hours of the day, any stocks your following, and how they've changed throughout the day, and if you get right to the bottom it will even give you a heads up on the next day. Such as, you have an early start tomorrow with your first appointment at 6am.

Multitasking has been given a number of really excellent updates too, and not only aesthetically. For starters switching between apps is simple, easy and straight forward. In a similar fashion to what is currently the process, double clicking the home button will show your open apps, with a screen preview of what it looks like. You can then tap that screen preview to go straight back to where you were or you can swipe the screen away to close the application. There's also a number of stuff going on behind the scenes too for multitasking. From Apple's website:

Multitasking has always been a smart way to switch between apps. Now it’s even smarter. Because iOS 7 learns when you like to use your apps and can update your content before you launch them. So if you tend to check your favourite social app at 9:00 am every day, your feed will be ready and waiting for you. That’s multitasking in iOS 7. It knows what you want to do before you do.
Photos have also been improved, with a number of live filters you can set when taking a shot, and the way that the photos you have in your library are organised. iOS 7 automatically sorts your pictures into events or collections related to a holiday or a day trip you took somewhere. You can zoom all the way out too to get a year's glance at all your photos you have taken.


The last feature I'll mention here is the Air Drop feature. If you want to send a file or link or picture, or.. pretty much anything, you can with Air Drop. iOS 7 recognizes other devices around you and shows that persons face or name as a person you can send a file to. According to Apple:
Sending a photo or a document to someone via text or email is fine. But if that someone is right next to you, a text or an email suddenly feels like too many steps. Enter AirDrop for iOS. It lets you quickly and easily share photos, videos, contacts — and anything else from any app with a Share button. Just tap Share, then select the person you want to share with. AirDrop does the rest using Wi-Fi and Bluetooth. No setup required. And transfers are encrypted, so what you share is highly secure.
There are many, many more features coming with iOS 7 next week, and these are just a few. If you want to see more, check out Apple's website which will have more info on iOS and you can see all the features there too.
http://www.apple.com/au/ios/ios7/


iOS 7 Promo video, from Apple:

If you liked this post, or found it useful, please feel free to share with your friends to pass the info on using the buttons below.

Tuesday, 21 May 2013

How to tether your iPhone with your computer

This is one I get asked a lot.

I have an iPhone/tablet/iPad and I want to share the Internet connection it has with my laptop when I'm on the road. How do I set it up?

Luckily, this is an easy one!

From your iDevice, hit the settings icon
Then choose the personal hotspot menu option (usually 3rd or 4th option)

Then slide the switch on the following page to "on".

After this is done, go to your laptop, and search for available wireless networks. Your iPhone's name should be in the list, and all you need to do is enter the password on your iPhones screen. Mine in this case is cheese47

Once connected on your laptop you should be able to get online and browse the Internet.

Note that this also works for any other devices you need to connect to the Internet that have a wifi connection, but no 3G or 4G or LTE access.

Hope this helped!

Any questions? Feel free to ask in the comments below, and if this helped you or a friend, please share the love with the sharing buttons!

Tuesday, 9 April 2013

Windows XP support ending

One year from today, Windows XP will be officially unsupported by Microsoft.

As noted on their life-cycle support page, there will be no more updates coming out of Redmond for the unbelievable success that is Windows XP. This operating system has been going since 2001, which makes it 12 years at time of writing. For software to last that long in the industry where things are changing every minute, and people have a hard time keeping up with the trends this is a huge deal, and massive success.

However, as mentioned, this success is coming to an end. Microsoft will be officially discontinuing the product. What does this mean for you?

  • Security vulnerabilities. If hackers find an exploit in Windows XP that is currently unpatched, they might choose to wait till after the product is discontinued before attempting their attacks on a system, or systems. This is a very real threat, that could cause loss of data, identity theft, etc. Having an up-to-date system is very important to receive regular updates on these vulnerabilities, and ensure your computer is patched and updated.
  • Hardware support. With new hardware coming out and the discontinuation of XP, getting digitally signed drivers for your hardware will become a very difficult task. You may not get the best performance out of your hardware, or worse, it might not even work, as there may not be a driver for it available.
  • Software support. Newer programs such as Microsoft Office, Internet browsers, etc may stop receiving support for XP, and as such, you'd experience a slower performance, web-pages may not display properly, or not at all, and some programs may cease to operate altogether.
So, with the above in mind, you'll probably need to get a new system. Unless your computer is as old as XP is, there is a good chance that it will work fine with some of the newer versions of Windows that are available.

Purchasing a copy of Windows 7 is impossible through Microsoft I've been informed both by trying myself online on the Microsoft store, and on the phone, but it is available if you go to computer shops and retailers that may still have copies left available for sale.

If you missed out on the Windows 8 upgrade offer from Microsoft when Windows 8 was first announced for $39, Windows 8 is available for sale on the Microsoft Store for AU $149.99, which will get you the Windows 8 operating system. However, some places are selling copies of Windows 8 for $59 on the store shelves, I have seen it available at JB-HiFi (if you live in Australia). Even if you don't need it now, you should probably get it before stocks run out at that price, and you'll have to pay nearly 3 times that later.

Alternatively, if you have XP on an old machine, and you don't think it will last more than a year, you may be better off just holding out, and buying a new computer next year which will come with Windows pre-loaded on it.

Any questions? Fire away in the comments section below!


If you liked this post, or found it useful, please feel free to share with your friends to pass the info on using the buttons below.

Tuesday, 12 February 2013

Easy steps to keep your Windows 8 PC backed up

With the recent release of Windows 8 from Microsoft, keeping your PC protected and backed up is simple and effective in the rare event of a system failure. Let's get it setup!

To start, lets move the mouse to the right hand side of the screen, and choose the search option from the charms that appear on the right. (see pic). In the box that appears type "recovery". Choose the settings option underneath the search box, and one of the options in the list should be labeled windows 7 file recovery. Don't worry about the fact it says windows 7, this is just carried over from the previous versions of windows, so if you already have a backup, you can continue to use it.

The next screen that appears should look something like this:

As you can see, this computer that I'm using is already backing up to a network location, however if you haven't already got yours setup, there should be a setup backup option you can click on to start the wizard which will guide you through the process.

The first screen will ask you where you want to save your backup. I'd recommend saving it to a external hard drive, or a network drive, as there is no point saving it to the same hard drive your computer is currently using, as that would render the whole back up process pointless if your hard drive fails :)

As you can see, I have a few hard drives and a network location saved on this computer to use. I'm going with the network drive option. If you want to save on a network also, you can click save on a network button which will take you to a separate screen to get setup.

Once you've chosen what your location, you then need to choose what you want to back up. You can let windows decide, or you can choose what you want to back up. I like this option, as I feel it gives me more control over what will be backed up, opposed to what might be backed up. The next screen, asks what specifically I want backed up.


In this instance I am backing up my libraries, and everything on my system drive. If you only have one hard drive, I'd recommend choosing to enable the system image option.

Clicking next will review the settings you've selected and you can save and exit the wizard. The computer will then start backing up your files.

Things to note:
  1. If you've selected an external backup drive, make sure it's plugged in when you want to back up
  2. If it's not, Windows will wait till the next time it is to make the backup
  3. I'd suggest to come back to the back up page every now and then to make sure it still is backing things up for you and that the settings are still up to date.


If you liked this post, or found it useful, please feel free to share with your friends to pass the info on using the buttons below.

Friday, 4 January 2013

iOS 6's Do Not Disturb feature mode not functioning

Image: Engadget
If you've got an iDevice (iPhone, iPad, iPod) and you've been using the new iOS 6 that Apple release late last year, you may have become familiar with a feature called Do Not Disturb.

When activated, a crescent moon appears in the notification bar up the top of the screen, indicating that it is activated. This mode silences all sounds and notifications, and prevents the screen from illuminating.

However since the turn of the year, many users have reported (myself included) that this feature doesn't work properly when you have it set to a schedule. Either it doesn't activate at the right time, or is doesn't come out of DND mode, meaning that until you manually turn it off, your device will remain silenced. As you can imagine, this is really annoying for some people who will have missed phone calls or messages because they didn't know their phone wasn't ringing.

Apple have acknowledged the problem, but instead of sending out a fix they've suggested to just use the mode manually until after January 7, where the problem is expected to resolve itself.

Symptoms
After January 1st, 2013, Do Not Disturb mode stays on past its scheduled end time.
Resolution
Do Not Disturb scheduling feature will resume normal functionality after January 7, 2013. Before this date, you should manually turn the Do Not Disturb feature on or off.
To turn off the scheduling feature, tap Settings > Notifications > Do Not Disturb and switch Scheduled to Off.
Apple has had problems in the past with New Year's bug's where alarm clocks set in the new year wouldn't sound off causing people to be late for work, miss flights etc. The company also promised at the time the problem would "resolve itself" by the first Monday of the year.

If you liked this post, or found it useful, please feel free to share with your friends to pass the info on using the buttons below.

Thursday, 3 January 2013

Samsung Galaxy S3 "Sudden Death"

If you aren't already aware, there is a current issue plaguing Samsung's Flagship mobile phone product the Galaxy S 3 where after normal usage, or charging, that the phone becomes "bricked" or unusable.

There have been many widespread reports about this phone, but so far it seems that the international model - i.e. any country not from North America is the only one with the issue.

The shutting down for no apparent reason and not restarting thereafter, or “Sudden Death” issue has been reported on popular forums and on various tech news websites, and popular Android website XDA-Developers, which has more than 150 pages of posts where people have reported the same problem.

But there is some good news! A few hours ago a Dutch website Tweakers reported that a Samsung spokesperson has said: "The problem seems to be affect a “limited number of Galaxy S3 models with 16GB memory,” and it’s caused by a firmware bug."

A fix for this bug is luckily software related, but at time of writing the release date for the patch which resolves the issue is not available.

Samsung has admitted the fault is theirs, and with the upcoming patch to resolve the issue, we shouldn't see any more of this in the future. Rest assured if you are victim to this bug and  have a bricked S3, you should be able to organise a replacement or a fix through the warranty.

If you liked this post, or found it useful, please feel free to share with your friends to pass the info on using the buttons below.

Thursday, 27 December 2012

Something for nothing from Apple

Anyone with an iOS device, and those new to Apple's iOS software, yes I'm looking at you, people-that-just-got-something-Apple-related for Christmas, should check out Apple's free app, 12 Days of Christmas.

Link to application on iTunes

Every day, following Christmas Day, there will be a free gift from Apple to you when you open the app on that day.
The first day (26th) was 2 remixed songs from Maroon 5 and a video, and the second day - today, the 27th, is a game called Score! which is a soccer (or football, depending where you're from) game.

The remaining 10 days are yet to be seen, but I'm sure there is something for everyone.

If you liked this post, or found it useful, please feel free to share with your friends to pass the info on using the buttons below.

Friday, 14 December 2012

My Wii U experience

So far, not good.

I bought a Wii U premium black edition last night with the copy included of Nintendo Land.

As I was setting it up the screen went blank, and then nothing happened for about 20 minutes, I turned the power off. Then turned it back on. Nothing happened. The Wii controller showed that it could not connect to the Wii, even though I could power the Wii up with the power button from the controller.

So with a little bit of technical knowledge on things like this, I left it off for about 20 minutes unplugged from the power cable, and also pulled the power cable out of the wall socket.

Turned it back on with no luck. The TV continued to show no signal on the HDMI port that it had previously been working on. So I got the component cable from my old Wii and plugged that in to my TV and new Wii U thinking that perhaps the HDMI port had become faulty on the Wii or the TV as the Wii showed that it was on by the blue light, and the fan spinning. Still nothing. I then tried all the HDMI ports on the tv and the AV plugs I had. Nothing.

All this time the Wii Controller would not reconnect to the Wii, even though it could power the main unit on.

So I took it back this morning to the shop I bought it from, and got an exchange for a new one.

The second unit I had more success with, though only for a short time. The unit powered on fine, connected to the TV and Wii Controller. I was able to play a little bit of Nintendo Land and set up a Mii. Then, midway through a game on Nintendo Land, the Wii just froze, along with the Wii Controller, and I couldn't do anything. So with history repeating itself a bit, I turned off the Wii again, pulled the plugs out and tried again. Twice. Both times the machine powered on, but I was met with the Wii U screen logo on both the control and the TV, and cannot get any further.

I called the Nintendo support people who took down my serial number and suggested I leave the power off for about 30 minutes from both the wall outlet, and pulling the power out of the machine from the back. The guy I spoke to strongly suggested to do a system update as I bought the wii from the initial launch period. He recommended to me to power it back on and if I get the same screen to take it back a second time for a third new machine, but in the event I could get it going to do a system update.

So this is where I am now as I eat my lunch writing this entry. I'll update the blog later with an update of what happens.

If you have the same experience, I'd recommend calling Nintendo for help or taking your unit back. There seems to be a major issue with the firmware on the new Wii U systems that are being sold on launch day. A disappointing time for Nintendo who are already struggling in the gaming industry.

Update: Looks like it won't go past that screen after waiting the 30 minutes, so I'm taking back to the shops now.

Update 2: The place I bought it from was surprised to see me a third time so they unboxed a new Wii for me, set it up and downloaded all the necessary updates, and tested a few games to make sure it worked. Took it home and it's fine, playing Super Mario Bros for Wii U now. Looks like the firmware update is the key to be the first thing that needs to be done when getting a new Wii setup.

Hope all of that helped. :)


If you liked this post, or found it useful, please feel free to share with your friends to pass the info on using the buttons below.

Thursday, 13 December 2012

Beware of Whatsapp scammers

A few hours ago I got a text from an unknown number to me on a popular texting app on smartphones called WhatsApp. After a quick google of the country code it showed that the number originated from Thailand.

If you ever get unsolicited text messages from anyone it's always helpful to try and google the number to see if it shows up anywhere. I've included my screenshot below from when I got the message.

It's very import and you just delete the message straightaway and do not click any of the links inside the message. Clicking the links inside will take you to a website which shows to the sender that you have validated your number and displayed in interest. The scammer will then continually likely send you text messages and all call you in order to get information from you.

In this instance, the number that I got the message from was +66 86 643 2701

Just a warning to everyone to not click any links you may get a message from from this number or from any number that you don't recognise for that matter.

This is another friendly public service announcement :)

Wednesday, 12 December 2012

Windows 8: How to get the snipping tool back

If you've got Windows 8 and you used the snipping tool a lot in Windows 7 butyou can't find it in 8, you've come to the right place.

To get the snipping tool, go to Start by hitting the Windows key on your keyboard, or button if you're using a tablet. Then just start typing the word "snipping tool"

It's likely that before you even finish typing the two words the icon will appear. Click it, and away you go!

You can pin the snipping tool to the Start menu if you use it frequently by right-clicking the icon before you launch the program, and choosing "Pin to Start" down the bottom.
You can also do this with any application you use frequently. Just start typing the name if you don't see it, and pin it to the start menu. You can then rearrange your start menu as you like by dragging the tiles around to where you like them.

If you liked this post, or found it useful, please feel free to share with your friends to pass the info on using the buttons below.

Monday, 10 December 2012

Windows 8: How to access "My Computer"

I've recently upgraded my computer to Windows 8, and I am the sort of person who keeps all of their files in organised folders - sort of. Since the introduction of the new operating system from the team at Redmond, aka Microsoft, I've found that accessing these files is not easy to do like it used to be. Either I'm not taking the right steps, or the options just aren't immediately accessible.

I have found a solution that works in the interim. On the right, is a picture of the task bar, with the familiar icons (the first two anyway) that come as standard with a Windows 7 installation. As I upgraded from Windows 7, I am unsure if they are standard with Windows 8, but this guide is going on the assumption that you either upgraded from 7 or they are standard in 8.

Clicking the folder icon will bring up the "Libraries" window which shows your documents, pictures, videos etc. On the right is a navigation pane, which you can use to view different folders on your computer. You'll notice that there is the "Favourites" section up the top, then the Libraries section, then Homegroup and finally Computer. The "Computer" section is the one we are interested in for this guide.

Right clicking it will give you a number of options, look for the one that shows "Pin to Start".

This will create a tile in your start menu, which you can access from literally any program simply by hitting the Windows key on your keyboard.

You can move this tile around by clicking and dragging it to the desired location in your start menu screen, giving you instant access to your hard drive, devices and network locations attached to your computer.

If you have any questions or comments, feel free to post in the comments section below.

If you liked this post, or found it useful, please share with your friends to pass the info on using the buttons below.

Wednesday, 22 August 2012

Adding a table of contents to your report

Writing a report whether for school, for university or for a job is something most people will come across at least once in their life. One of the key features of a report is a table of contents. But instead of entering all the page numbers manually, and spending hours formatting it, most word processor applications such as Microsoft Word for Windows and Mac, and the Pages application from the iWork suite for Mac have a the table of contents feature built in.


This post is separated into three parts depending which software/system you are using.

  1. First is Pages for Mac, 
  2. Second is Word for Mac, 
  3. Third is Word for Windows

Please scroll down to find the section relevant for you!


Thursday, 16 August 2012

New MacBook Air 13" Reviewed

My old laptop was getting a little slow for my personal use, and so I donated it to my better half for her use. And I got myself a new MacBook Air for Uni/Blogging/Photo editing purposes.

First off the bat, let me say that this is a great machine. The slim design, the battery life and the display are all fantastic, and I am really happy with it.

The thing that impressed me the most was the resolution on the 13" display. My previous laptop was a 15" MacBook Pro, with the same resolution. 1440x900. However having the same resolution on a smaller screen makes everything seem so much crisper than before. I did consider for a brief moment the MacBook Pro with the retina display but the price tag was a little too high given the specification it came with. I felt I just couldn't justify purchasing it. Having a resolution like this on a small screen is kinda like the improvement noticed between a using an iPhone 3G (and 3GS) then using an iPhone 4. Everything is sharper. And when it comes to reading text, or editing photos, you can really see the difference. But enough about the display, what else?

The size is perfect. 11", the model below the 13" felt too small when I picked it up in the shop. And the display did feel a little cramped when opening a webpage or a document. It's lightweight, unlike it's brothers in the "Pro" side, and the battery life is really good. Lasts just long enough for a day at uni, without the need to bring a charger.

The SSD (solid state drive) which is the internal storage for the laptop makes accessing files instant, and the power on time is much faster. There is virtually no lag at all on the machine when in use, however I have noticed that when resuming from standby, i.e. opening the laptop from closed position, that there is a bit of a delay before the input is recognised. Although the display does light up and show instantly, mouse movements and keyboard inputs are not recognised for approx 3-5 seconds, sometimes up to 10 seconds. However when in use, everything is a snap, and multi tasking is a breeze. The laptop can quite easily handle multiple applications open at the same time. For example, I have at least 10 apps open at the moment (in addition to the other system applications) and switching between them is instantaneous and responsive, this is because of the SSD and the 4GB of ram that the computer has, allowing multiple processes to easily be handled.

I am very thankful that Apple has decided to include a backlit keyboard with the Macbook Air's as it makes working in low light conditions, like on an Airplane, or in a dimly lit coffee shop (like where I am posting this right now) great, without having to strain your eyes to see where all the keys are.

One noticeable change with the move the ultrabook computing (MacBook Air falling into this catagory) is that there is an absolute minimum on external connections and ports. The most obvious example is the omission of a CD/DVD drive. Most Apple software that previously came on discs is available through their new "App Store


This store sells a lot of software made by Apple and other developers, and even includes entire Operating System upgrades - which is a huge change in the way that users upgrade their operating system. Normally this would involve buying a disk with a unique code that would assign itself to your computer. However with the introduction of the App store, software is now sold and assigned to your AppleID, or email address which is used to identify yourself with Apple. This means that if your computer get's stolen or damaged and is no longer useable, once you get a replacement computer all the previously paid for applications can be re-downloaded to your computer at no cost, as you have already paid for them. All you need to do is sign into the store with your Apple ID (or email address) and you can view your purchases. When I was at the Apple store, I signed in to the App Store on my new laptop and I was instantly able to download all of my applications! This was a huge bonus for me. So the omission of the CD drive is significant, but much of the content from discs is now available online, movies and music included. In the rare case you do need to use a CD drive you can "borrow" the drive from a nearby Mac via wireless, or you can purchase a USB drive which attaches itself to your computer.

Finally the exterior. This was another reason I picked the 13" over the 11". The additional port for the SD card slot made the 13" a clear winner for me. Having a hobby in photography, being able to shove my SD card into the side of the laptop without the need to actually get the camera, and a cable plugged into the laptop is a huge help and saves time and effort in getting my pictures onto my computer for editing as quick as possible.


There is not a lot wrong with this laptop. At all. Apart from setting up bootcamp (read: installing windows) on to this computer which I could see to be a problem this laptop has it all. For the amount of power packed into this very lightweight machine, the two USB3 ports, the thunderbolt port and the SD port this machine is very reasonably priced especially with the latest 3rd generation ivy bridge processor.

For an everyday laptop with punch, battery life, and speed, this is an excellent buy and I have yet to complain about anything. 5 out of 5 stars from me.


If you liked this post, or found it useful, please feel free to share with your friends to pass the info on using the buttons below.